


The Basics of CNG Conversion Kit Installation
This article is for educational purposes only. We strongly recommend that all CNG conversions be completed by experienced mechanics familiar with CNG systems. Before any installation, you should be familiar with all regulations applicable to CNG conversion.
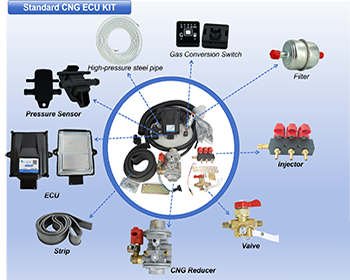
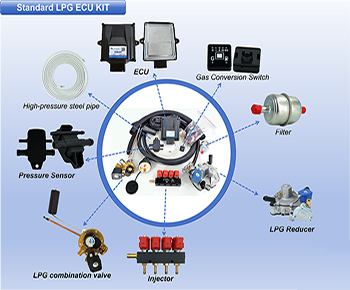
Step 0- Starting with a high-quality conversion kit
To ensure optimal vehicle performance and a direct installation experience, it is essential to purchase a good CNG conversion kit and familiarize yourself with each component.
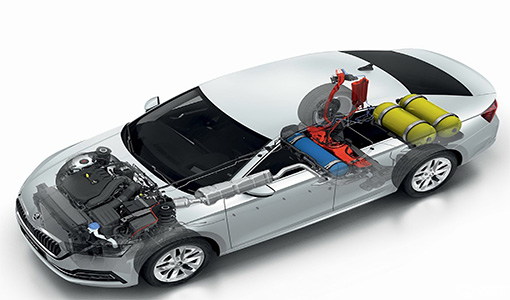
Step 1- Installation of natural gas cylinders
Purchase and install a CNG gas cylinder (also known as a CNG storage tank), which includes a pressure reducing device (PRD) and a shut-off valve (manual or remote). You will need steel straps and brackets to install the cylinder in the vehicle.

Step 2- Plan carefully before starting
Before you start tying things to the car, determine the optimal location for installing each component and hose. This will include components under the hood, on the dashboard, and under the vehicle.
If you install CNG cylinders inside the vehicle, it is required that all pipes and component connections are airtight and create a ventilation opening for the PRD (usually through the vehicle floor).
Step 3- Positioning the CNG filling port
The CNG filling port is the place where the CNG pump is connected during refueling. Although it is usually placed next to the fuel cap for convenience, some car owners prefer to place it on the truck base, under the hood, or even on the car grill.
Step 4- Install the high-pressure CNG pipeline
High pressure CNG hoses should be kept as far away from the engine exhaust system as possible. Since this part of the system also includes regulators and optional filters, you also need to find the location to install these regulators. The shut-off valve should be installed as close as possible to the CNG cylinder to assist in isolating the CNG supply in emergency situations, followed by the installation of filters (if applicable) and regulators.
The CNG fuel pipeline should be firmly fixed under the vehicle to protect it from road vibrations and debris. Cover the steel wire with a rubber fuel hose where it passes through the metal surface or forms sharp corners. As mentioned above, keep it as far away from the exhaust pipe as possible. Ensure there is sufficient clearance in the pipeline for the installation of other components! Connect the pressure gauge (pressure gauge) using a T-joint
Step 5- Install the regulator
The regulator should be securely tied to the frame using steel straps (available from any hardware store). It must be aesthetically pleasing and safe to prevent high-pressure fuel lines from moving around. The output low-pressure CNG connector should face the engine. Please remember that the coolant line will also be connected to the regulator. You will use hose T-joints to connect these hoses to the heater hoses on the vehicle. Connect one of the pipelines between the heater control valve and the engine.
Step 6- Install the mixer
This step is only applicable to the mixer suction conversion kit, please confirm that you have a suitable size mixer. The inner circumference of the mixer (3.14 x its diameter) should be half of the circumference of the throttling plate. Install the mixer into the intake hose as close to the throttle body as possible. This kit can even be directly bolted onto the throttle body inlet. Ensure that the mixer is fixed and there is no gap inside the intake hose.Next, install the stepper motor control valve in the low-pressure CNG pipeline between the regulator and mixer. Professional tip: Ensure that its position does not allow moisture to enter the interior of the motor.
Step 7- Install the injection system
This is the most daunting part of the installation process, especially drilling, tapping, and installing the nozzle into the intake manifold. Note: If the manifold is made of plastic, it may not need to be removed. Position the nozzle as close as possible to the existing gasoline injector and secure it with thread locking adhesive. Place the fuel injector rail as close to the nozzle as possible. Installation personnel usually creatively use brackets and connectors purchased from hardware stores to complete this step. Your conversion kit includes hoses that must be cut according to the length from the injector rail to each nozzle. Firmly tighten the hose clamps at each end.
Step 8- Electronic Connection
Connect the MAP sensor and electronic control unit (ECU) to the vehicle's OBD system according to the CNG wiring diagram. This allows the electronic control unit to communicate with the vehicle's engine management system. The speed wire should be connected to the negative coil of the engine. Ensure that the electronic control unit is connected to a protected and dry place under the engine hood or dashboard.
Step 9- Install the CNG controller and fuel gauge
Find the existing hole that passes through the engine firewall, then install the instrument panel in a convenient space and connect it to the ECU.
Step 10- Calibration
Connect the laptop to the vehicle's OBD port using the provided USB to serial cable. Follow the calibration steps on the screen to fine tune your new CNG conversion kit! Calibration may occasionally require updates. We recommend recalibrating every 10000 miles or when you notice any changes in the vehicle's performance.
Bottom line
1. The installation of the CNG conversion kit can be successfully completed by anyone with general mechanical skills, but it is not something to take lightly! For safety and performance reasons - just like most things - proper planning and preparation can prevent poor performance.
2. I hope this brief guide can give you a clearer understanding of what you will undertake if you decide to complete the installation yourself. Alternatively, if you (wisely) decide to have a certified installer complete this task, provide you with a useful list of what to look for when supervising the process and receiving finished products.
3. If you have any questions or need assistance, please feel free to contact us at any time.
 Refer to:https://blog.skycng.com/the-basics-of-cng-conversion-kit-installation
The pictures and articles are from the internet. If there is any infringement, please contact us to delete them.
Popular articles
-
How the CNG Automotive S
Compressed natural gas (CNG) automotive systems
-

What Is CNG Pressure Red
The pressure reducer of natural gas vehicle is
-
Advantages Of CNG Gas V
Compressed natural gas vehicles are vehicles th
-
Advantages And Principle
LPG and CNG are two mainstream alternati
-
Differences Between Sing
Characteristics of Gas Single Point Device
-
Reasons For High Gas Con
1. Original vehicle condition A. The tec
-

Working Principle Of CNG
Working principle of gas injection rail
-
How To Improve The Power
1. Install ignition advance angle What i


Latest comments
0piece comment
no comments, welcome to comment。